Swift 3 新特性【译】

原文:http://www.appcoda.com/swift3-changes/

Swift3的改变,主要划分为下面两个部分:

  • 删除了Swift2.2已经过时的特性。(Removed features that have already been deprecated in Swift 2.2)
  • 语言现代化的问题。(Language modernisation issues)

自增与自减操作(++--)

继承自C的自增与自减操作符:

1
2
3
4
5
var i = 0
i++
++i
i--
--i

使用+=-=代替:

1
2
3
var i = 0
i += 1
i -= 1

进一步的阅读: If you want to learn more about the motivation behind this change, check out Chris Lattner’s proposal on the removal of ++ and — operators.

C样式循环成为过去式(C-style)

如果打印数字1到10,你以前可能会这样写:

1
2
3
4
5
for (i = 1; i <= 10; i++) {
print(i)
}

在Swifty 3中不再允许这样做,将采用下面的代码代替:

1
2
3
for i in 1...10 {
print(i)
}

或者你可以采用闭包的简短参数写法循环相关点击这里):

1
2
3
(1...10).forEach {
print($0)
}

从函数参数中删除var

函数参数通常定义为常量,当然在Swift2中函数参数可以用var修饰。
举个例子,下面的函数计算一个给定两个数的最大公约数。如果你忘记了高等数学课程,点击这里

1
2
3
4
5
6
7
8
9
10
11
12
13
14
15
16
func gcd(var a: Int, var b: Int) -> Int {
if (a == b) {
return a
}
repeat {
if (a > b) {
a = a - b
} else {
b = b - a
}
} while (a != b)
return a
}

在Swift3中不再允许,因为上面的做法可会混淆varinout。所以最新的Swift版本删除了var作为函数参数的修饰。
所以改写上面的例子,你需要用本地变量保存传入的值:

1
2
3
4
5
6
7
8
9
10
11
12
13
14
15
16
17
18
19
func gcd(a: Int, b: Int) -> Int {
if (a == b) {
return a
}
var c = a
var d = b
repeat {
if (c > d) {
c = c - d
} else {
d = d - c
}
} while (c != d)
return c
}

进一步的阅读: If you want to learn more about the motivation behind the removal, you can check out the original proposal.

函数参数标签行为始终如一(Consistent Label Behaviour for Function Parameters)

拿上面的gcd()做例子。你可以这样调用它:

1
gcd(8, b:12)

或者你可以用下面这种元组方式调用:

1
2
let number = (8, b: 12)
gcd(number)

正如你所看到的,在Swift2中调用函数,你不需要指定第一个参数的标签。不过,无论怎样你都需要指定第二个参数的标签。
这种语法会使初学者产生迷惑,所以在Swift3中被设置为标准化的标签行为。如下所示:

1
gcd(a: 8, b: 12)

如果你把第一个参数的标签省略掉,那么在Xocde8中将会提示错误。
当然Apple提供采用_来隐藏函数调用时的第一个参数标签,如下:

1
2
3
4
5
func gcd(_ a: Int, b: Int) -> Int {
...
}

进一步阅读: For the motivation and intent behind this change, you can check out this proposal.

字符串形式的Selectors不再工作

创建一个Button并添加你点击它时去做某件事。使用playgrounds:

1
2
3
4
5
6
7
8
9
10
11
12
13
14
15
16
17
18
19
20
21
22
23
24
25
// 1
import UIKit
import XCPlayground
// 2
class Responder: NSObject {
func tap() {
print("Button pressed")
}
}
let responder = Responder()
// 3
let button = UIButton(type: .System)
button.setTitle("Button", forState: .Normal)
button.addTarget(responder, action: "tap", forControlEvents: .TouchUpInside)
button.sizeToFit()
button.center = CGPoint(x: 50, y: 25)
// 4
let frame = CGRect(x: 0, y: 0, width: 100, height: 50)
let view = UIView(frame: frame)
view.addSubview(button)
XCPlaygroundPage.currentPage.liveView = view

上面使用了字符串做为一个selector。如果你输错了,这段代码是允许编译通过的,但是在运行中如果找不到相关的selector,将会crash掉。
Swift3使用#selector()关键字替代它。在编译期间提前检查方法名是否正确。

1
button.addTarget(responder, action: #selector(Responder.tap), for: .touchUpInside)

进一步的阅读: For the motivation and intent behind this change, you can check out Doug Gregor’s proposal.

上面这些是删除的特性,接下来是最精彩部分 – 语言现代化

字符串形式的Key-paths

这一特性跟前面一节相似,不过这次是应用在key-value coding(KVC)与key-value observing(KVO):

1
2
3
4
5
6
7
8
9
class Person: NSObject {
var name: String = ""
init(name: String) {
self.name = name
}
}
let me = Person(name: "Cosmin")
me.valueForKeyPath("name")

同样的,如果你输入错了,什么事都可能发生,这样的话我怎能开心起来!🙁
幸运的是,这一切不会发生在Swift3中。使用#keyPath()表达代替它:

1
2
3
4
5
6
7
8
9
class Person: NSObject {
var name: String = ""
init(name: String) {
self.name = name
}
}
let me = Person(name: "Cosmin")
me.value(forKeyPath: #keyPath(Person.name))

进一步的阅读: For the motivation and intent behind this change, you can check out David Hart’s proposal.

去掉Foundation类型的NS前缀

一个典型的JSON解析例子:

1
2
3
4
5
let file = NSBundle.mainBundle().pathForResource("tutorials", ofType: "json")
let url = NSURL(fileURLWithPath: file!)
let data = NSData(contentsOfURL: url)
let json = try! NSJSONSerialization.JSONObjectWithData(data!, options: [])
print(json)

采用下面代码代替:

1
2
3
4
5
let file = Bundle.main().pathForResource("tutorials", ofType: "json")
let url = URL(fileURLWithPath: file!)
let data = try! Data(contentsOf: url)
let json = try! JSONSerialization.jsonObject(with: data)
print(json)

进一步的阅读: For this naming convention change, you can check out this proposal written by Tony Parker and Philippe Hausler.

M_PI vs .pi

用已知圆的半径来计算它的周长与面积:

1
2
3
let r = 3
let circumference = 2 * M_PI * r
let area = M_PI * r * r

老版本的Swift采用M_PI引用pi常量。Swift3中FloatDoubleCGFloat都整合了pi常量:

1
2
3
Float.pi
Double.pi
CGFloat.pi

所以上面计算面积、周长的代码,在Siwft3中将会是这样写:

1
2
3
let r = 3
let circumference = 2 * Double.pi * r
let area = Double.pi * r * r

当然使用类型推断你可以删除Double等类型。下面是简短的写法:

1
2
3
let r = 3
let circumference = 2 * .pi * r
let area = .pi * r * r

Grand Central Dispatch

gcd是使用C写的API,比如下面创建了一个异步队列:

1
2
3
4
let queue = dispatch_queue_create("Swift 2.2", nil)
dispatch_async(queue) {
print("Swift 2.2 queue")
}

在Swift3中删除了冗余的东西,更接近面向对象的方式:

1
2
3
4
let queue = DispatchQueue(label: "Swift 3")
queue.async {
print("Swift 3 queue")
}

进一步的阅读: For further information about this change, you can check out this proposal written by Matt Wright.

Core Graphics更加的Swifty化

Core Graphics 是一个强大的绘制框架,但它使用了类似于GCD的C样式API写法:

1
2
3
4
5
6
7
8
9
10
11
12
13
14
15
16
let frame = CGRect(x: 0, y: 0, width: 100, height: 50)
class View: UIView {
override func drawRect(rect: CGRect) {
let context = UIGraphicsGetCurrentContext()
let blue = UIColor.blueColor().CGColor
CGContextSetFillColorWithColor(context, blue)
let red = UIColor.redColor().CGColor
CGContextSetStrokeColorWithColor(context, red)
CGContextSetLineWidth(context, 10)
CGContextAddRect(context, frame)
CGContextDrawPath(context, .FillStroke)
}
}
let aView = View(frame: frame)

而Swift3采用不一样的方法。先解包当前的graphics context然后再执行所有的相关操作:

1
2
3
4
5
6
7
8
9
10
11
12
13
14
15
16
17
18
19
let frame = CGRect(x: 0, y: 0, width: 100, height: 50)
class View: UIView {
override func draw(_ rect: CGRect) {
guard let context = UIGraphicsGetCurrentContext() else {
return
}
let blue = UIColor.blue().cgColor
context.setFillColor(blue)
let red = UIColor.red().cgColor
context.setStrokeColor(red)
context.setLineWidth(10)
context.addRect(frame)
context.drawPath(using: .fillStroke)
}
}
let aView = View(frame: frame)

注意: The context is nil before the view calls its drawRect() method, so you unwrap it with the guard statement – read more about this here.

动词 VS 名词命名规则

这里是一个打印10到1的代码块:

1
2
3
for i in (1...10).reverse() {
print(i)
}

Swift3加了ed后缀:

1
2
3
for i in (1...10).reversed() {
print(i)
}

使用元组打印数组:

1
2
3
4
var array = [1, 5, 3, 2, 4]
for (index, value) in array.enumerate() {
print("\(index + 1) \(value)")
}

Swift3加了ed后缀:

1
2
3
4
var array = [1, 5, 3, 2, 4]
for (index, value) in array.enumerated() {
print("\(index + 1) \(value)")
}

别一个数组排序的例子:

1
2
3
var array = [1, 5, 3, 2, 4]
let sortedArray = array.sort()
print(sortedArray)

Swift3使用sorted命名:

1
2
3
var array = [1, 5, 3, 2, 4]
let sortedArray = array.sorted()
print(sortedArray)

用点方法来排序数组,不使用中间变量。在Swift2中的写法是这样的:

1
2
3
var array = [1, 5, 3, 2, 4]
array.sortInPlace()
print(array)

Swift3使用sort()代替:

1
2
3
var array = [1, 5, 3, 2, 4]
array.sort()
print(array)

进一步阅读: For details of the naming convention, you can check out API Design Guidelines.

Swiftier APIs

Swift3在APIs上采用了简单的哲学。删除一些不需要的词语,比如一些冗余的或者通过上下文可以推断出来的:

  • XCPlaygroundPage.currentPage 变成 PlaygroundPage.current
  • button.setTitle(forState) 变成 button.setTitle(for)
  • button.addTarget(action, forControlEvents) 变成 button.addTarget(action, for)
  • NSBundle.mainBundle() 变成 Bundle.main()
  • NSData(contentsOfURL) 变成 URL(contentsOf)
  • NSJSONSerialization.JSONObjectWithData() 变成 JSONSerialization.jsonObject(with)
  • UIColor.blueColor() 变成 UIColor.blue()
  • UIColor.redColor() 变成 UIColor.red()

枚举

Swift3处理Enumeration Cases类似于属性,所以使用了小写驼峰代替大写驼峰法:

  • .System 变成 .system
  • .TouchUpInside 变成 .touchUpInside
  • .FillStroke 变成 .fillStroke
  • .CGColor 变成 .cgColor

@discardableResult

在Swift3中,如果你调用了一个函数或方法,而没有使用它的返回值。Xcode将会显示一条警告信息:

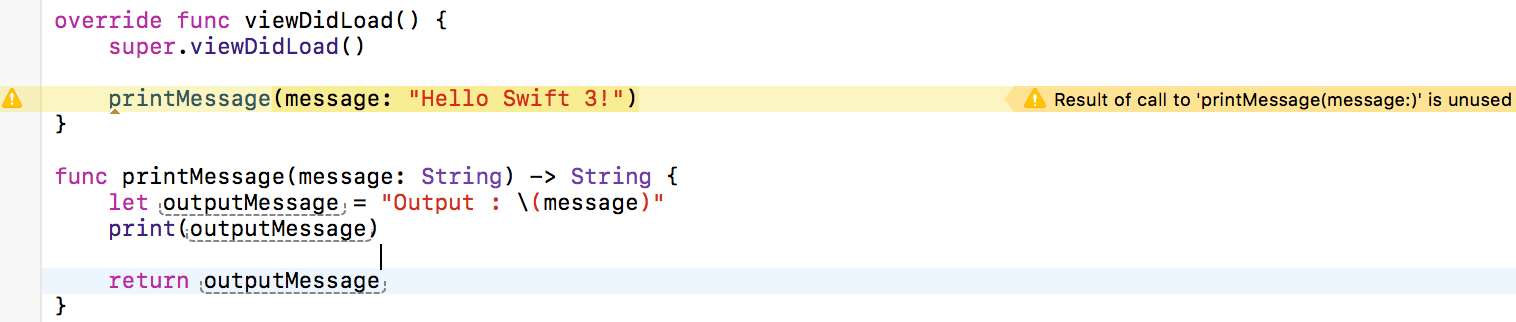
这种情况下你可以使用@discardableResult来忽略警告:

1
2
3
4
5
6
7
8
9
10
11
12
13
override func viewDidLoad() {
super.viewDidLoad()
printMessage(message: "Hello Swift 3!")
}
@discardableResult
func printMessage(message: String) -> String {
let outputMessage = "Output : \(message)"
print(outputMessage)
return outputMessage
}

总结

这篇教程所有的代码可以从Playground project获得。我使用的是Xcode 8 Beta版。所以要确保你是在Xcode 8上运行。
如果你任何问题或建议,请告诉我。愉快的编码吧!🙂